Tl;dr: By expanding on research, we were able to successfully gain full administrative access on a sample of laptops from corporate environments with Full Disk Encryption enabled in less than 10 minutes.
Background
Full Disk Encryption (FDE) has traditionally helped to mitigate the practical risk of “theft and loss”. Without FDE enabled, physical attacks that we commonly refer to as a “cold-boot” attacks are straightforward. You typically mount the local drive using a “Live USB or CD” and then access the SAM and SYSTEM files or modify System32 binaries replacing them with cmd.exe (ex. sethc.exe – sticky keys). Upon booting the system back up, you can obtain local password hashes or a command prompt running as “NT Authority\SYSTEM” by running the replaced exe. With FDE properly configured, we cannot mount the drive to read/modify these files.
While some attacks are possible with FDE enabled, most are hit or miss (ex. cold boot side channel attacks) or require the PC to be running in a certain state before the attack is executive (ex. suspended, sleeping). By expanding on existing research, we found that there is still a significant attack surface that can be exploited in order to gain access to the data and underlying operating system which result in the full compromise of a host in under 10 minutes.
Defeating FDE with DMA (Dell Laptop with CheckPoint FDE)
Understanding the Attack Surface
During initial analysis of our test device, we found the laptop we were testing was configured with Checkpoint’s “Drive Encryption Blade”, as we observed the splash screen during boot. However, with this configuration, pre-boot authentication (PBA) was not enabled. This means that when the device is powered on, the Trusted Platform Module (TPM), which stores the encryption key, would automatically decrypt the drive and boot into Windows. Knowing that we were able to successfully power the device on, and it would boot to the Windows login screen, we began researching potential attacks that would work. Ultimately, we came across direct memory access (DMA) attacks as a potential option. After examining the system, we identified a port for the wireless chip that supports DMA and could allow us to perform this attack. There are several blog posts that outline how to perform this attack; however, this could not be done if it wasn’t for the research and tools released (pcileech) by Ulf Frisk.
- http://blog.frizk.net
- https://github.com/ufrisk/pcileech
- https://www.synacktiv.com/posts/pentest/practical-dma-attack-on-windows-10.html
In order to perform the DMA attacks, additional hardware is required. The pcileech wiki provides a section on supported and recommended devices to use: https://github.com/ufrisk/pcileech#hardware-based-memory-aqusition-methods
For our testing, we went with the following hardware, while more expensive than others, it appeared to provide the most stability and support for additional attacks:
- Xilinx AC701 development board
- FT601 USB3 UMFT601X-B FPGA Add-On Board
- M.2 Key A/E/A+E to mPCIe Adapter
- mPCIe to PCIe
Disabling Additional Protections
After getting the hardware configured and setup for the attack, we were ready to start, however we were told ahead of time that there were additional protections that had been configured on the device to mitigate DMA attacks. This included enabling virtualization support, and virtualization technology for directed I/O (Intel VT-d) within the BIOS. As we weren’t sure whether these protections would successfully thwart our attacks, we wanted to ensure it was possible to disable them. Since we were working with a Dell laptop, we had two options:
- Generate a BIOS recovery password (https://bios-pw.org/)
- Remove the CMOS battery momentarily
We opted for the recovery password, as we wanted to make note of the current configuration so we could ensure we returned it to the proper state. Also, depending on the BIOS configuration, resetting it could result in us getting locked out of the drive. Using bios-pw.org, we entered in the “system number” and a BIOS recovery key was generated. For this laptop, we had to hit “ctrl + enter” for the system to take the recovery key.

Determining that the BIOS was password protected

Generating a recovery key using the “System Number”

Successfully bypassing the BIOS password using the recovery key
Once the BIOS password was cleared, we took note of all the settings that were configured and begin to disable the virtualization protections previously noted.
Note: During additional testing against Microsoft’s Bitlocker solution, we noticed that after enabling secure-boot, modifying any BIOS settings would force a prompt for the Bitlocker recovery key. This may have been configuration specific, but still something to keep in mind.
Executing the Attack
After stacking the deck in our favor (disabling protections), we needed to connect the system to our testing hardware. We removed the wireless network chip and connected our M.2 A/E card, which was connected to a mini PCI to PCI adapter, and that was plugged into the Xilinx development board.

Identifying our target, the wireless card port
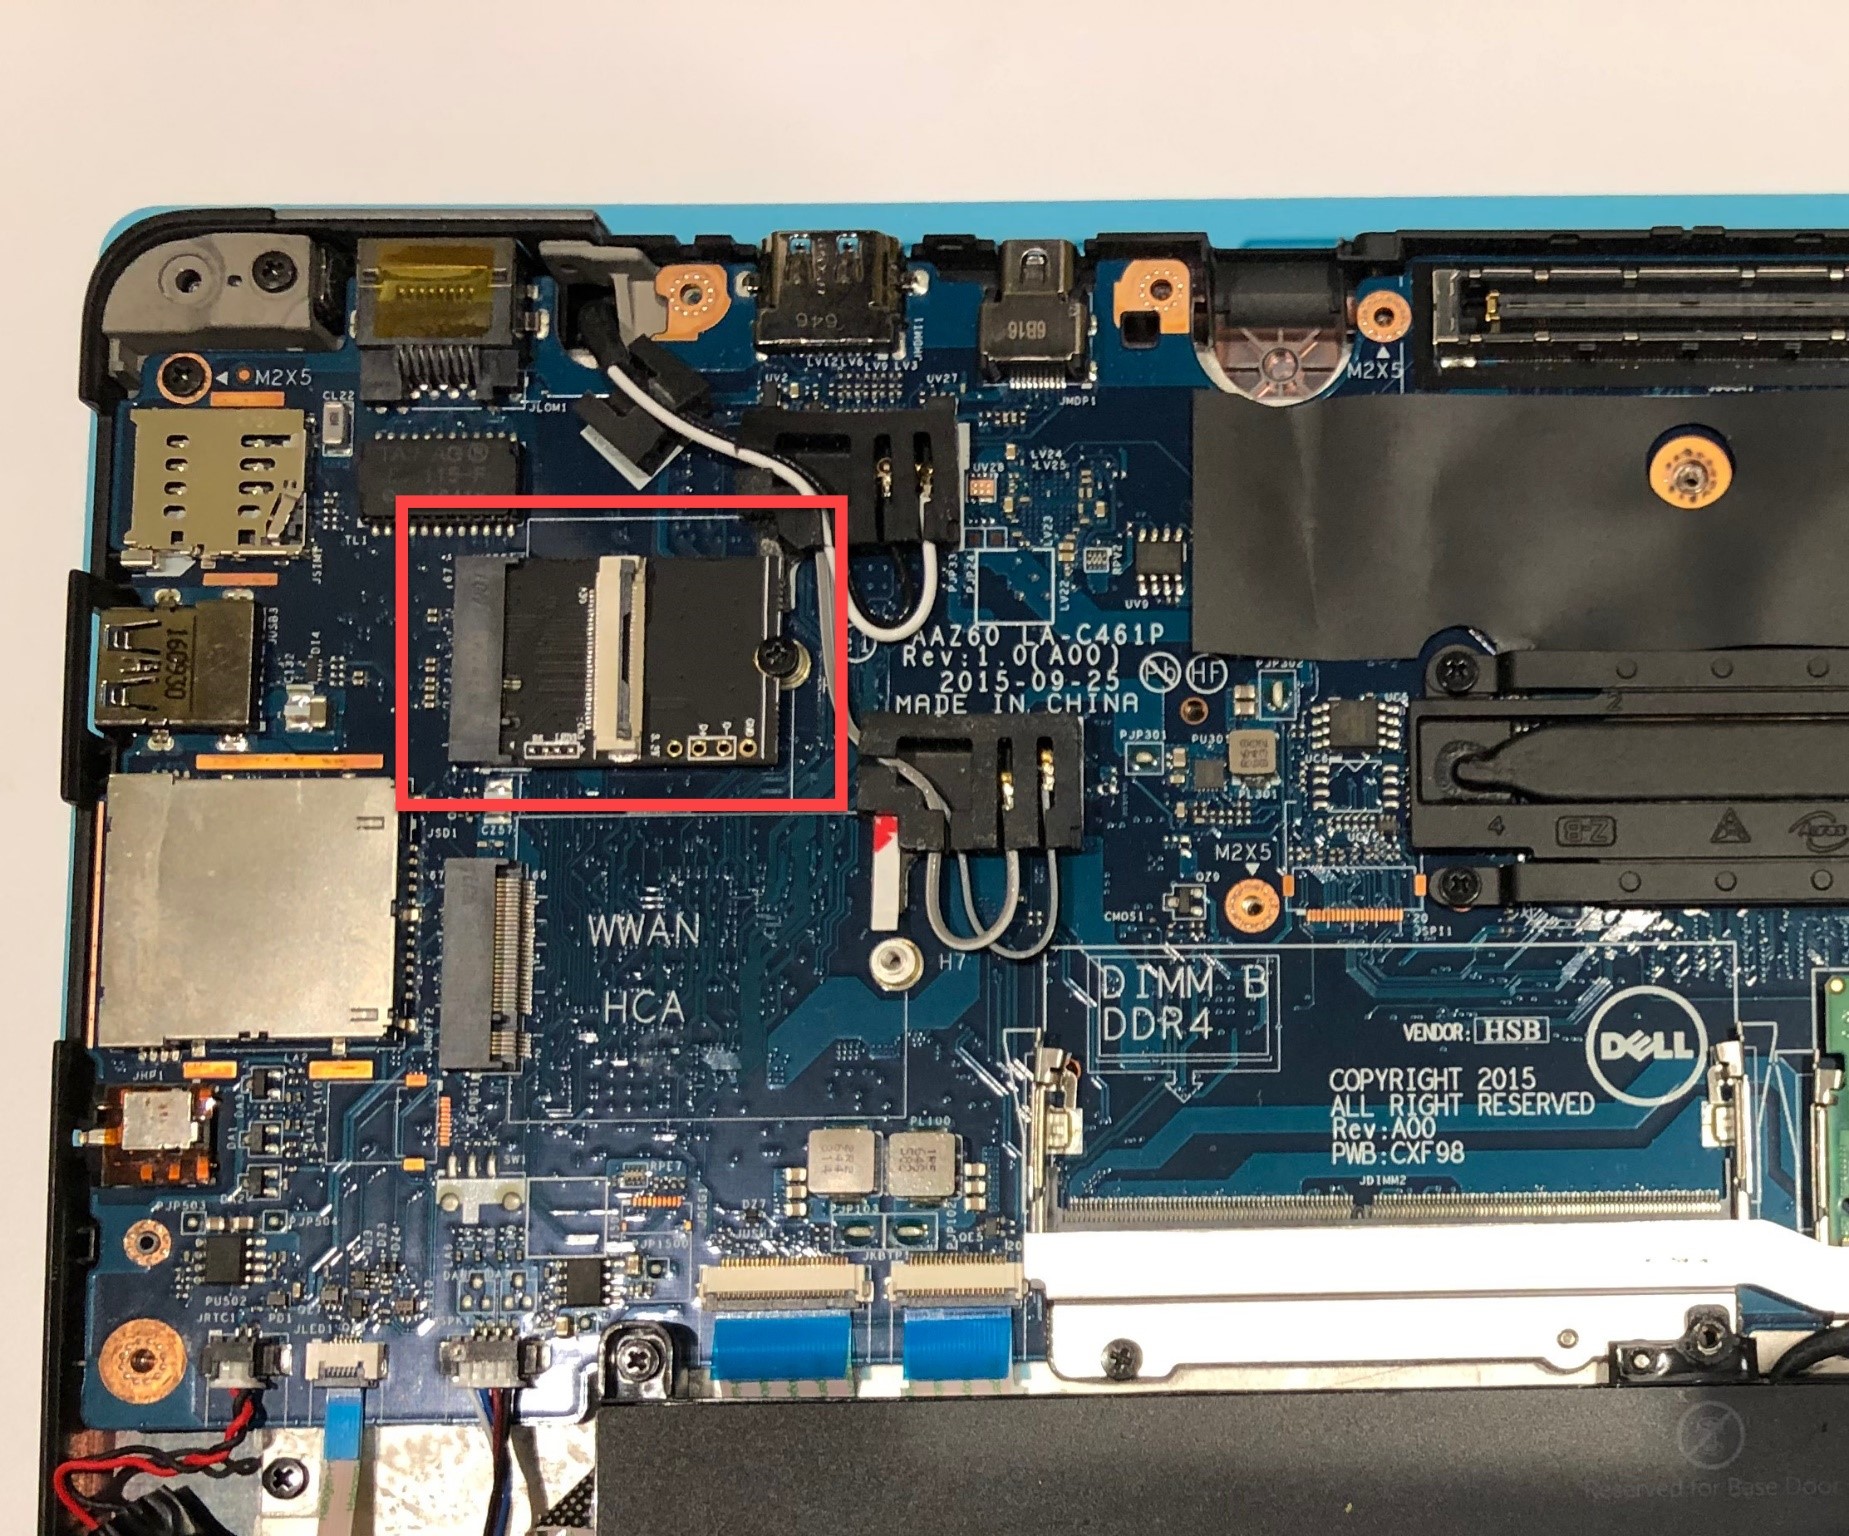
Replacing the wireless chip with our M.2 A/E adapter

The full setup with the laptop connected to the FPGA
We then booted the system up to the Windows login screen and attempted to use pcileech to read an address in memory.
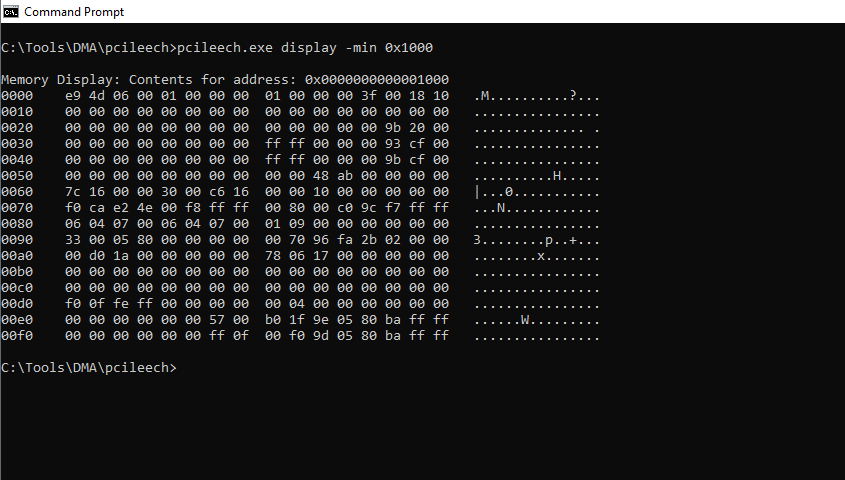
Reading a section of memory as a proof of concept to verify the tools were working
This worked as expected, since we had disabled the virtualization protections. We then wanted to get a shell from the login screen using the “wx64_pscmd” function. In order to run this, we had to first get a kernel module loaded, and then pass the address of the kernel module to the wx64_pscmd function.
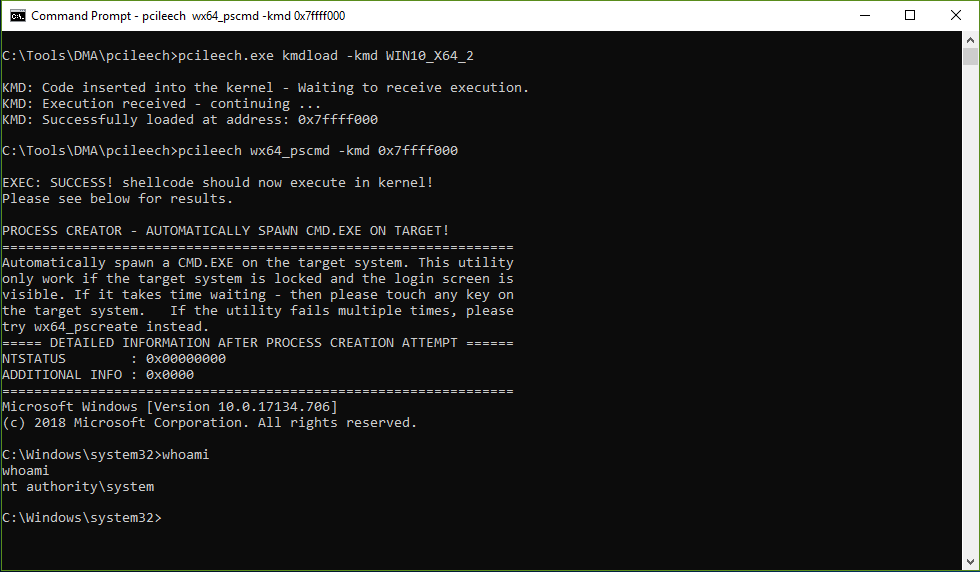
Getting a System level shell using the wx64_pscmd function
Success! Since we could get a shell, we wanted to see if we could attempt to bypass the Windows login using the “patch” function within pcileech. This works by searching through the devices’ memory for the specific signature of the MsvpPasswordValidate function and overwrites the password validation section. If this is successful, we can provide any password we want for local and cached accounts, and successfully authenticate to the system.
Expanding on Existing Research and Creating New Signatures
The pcileech project comes with several signatures for the various releases of Windows 10, however our workstation was on a later release, and as a result was not included in the signature file. In the Synacktiv blog post, the author gives us the information needed to create the signatures. We had a sample of workstations that were on the same Windows version and could pull off the “NtlmShared.dll” files. Using Ghidra, we loaded in DLL to try and identify the chunks required for the signature. This process was quite easy, even with us having never done it before.

Using Ghidra to identify the offsets for our signature file
While searching through the function to find the correct chunks required for the signature wasn’t difficult, it did take some time. If we wanted to do this at scale, with multiple DLLs from a range of Windows 10 releases, we needed a different method. Jean-Christophe, the author of the Synactiv blog post, previously created a script that extract the chunk information we’re looking for, https://github.com/Synacktiv-contrib/stuffz/blob/master/search_offsets_DMA.py. The only issue with the script was that it wasn’t working with Windows 10 DLLs, only 8.1 or earlier. Andrew Scott from my team was able to modify the script to search for the correct offsets, and output them in the proper signature format, so now you can feed it all the Windows 10 DLLs you want, and it will output the signature. The script can be found on our GitHub: https://github.com/SecurityRiskAdvisors/DMA-offsets

Generating the pcileech signature from our NtlmShared.dll using the “search_signatures_DMA.py” script
After obtaining the correct information required for the signature file, we added the new signature into the pcileech signature file, “unlock_win10x64.sig”. We then powered the system on, and we performed the patch using pcileech. The newly created signature worked, and we successfully bypassed the login.
Awesome! So now we know the signature file and patch worked as expected. We then went into the BIOS and started enabling support for the OS protections:
- Secure Boot (was already enabled)
- Virtualization Support
- Virtualization Technology for Directed I/O (Intel VT-d)
The requirements for VBS can be found here: https://docs.microsoft.com/en-us/windows-hardware/design/device-experiences/oem-vbs
Enabling Protections
After enabling these BIOS features, the OS “should” now start to protect itself since the client previously applied the configurations for VBS, and the attacks shouldn’t work, or so we thought. After powering the system back on, it turned out our patch function still worked, however the loading of kernel modules was prevented. After some investigation, it turned out that the registry settings that were originally applied, were not properly set. After going through and setting them properly we restarted the system and attempted the attack again.
- reg add “HKLM\SYSTEM\CurrentControlSet\Control\DeviceGuard” /v “EnableVirtualizationBasedSecurity” /t REG_DWORD /d 1 /f
- reg add “HKLM\SYSTEM\CurrentControlSet\Control\DeviceGuard” /v “RequirePlatformSecurityFeatures” /t REG_DWORD /d 3 /f
For details on enabling these using various platforms (GPO, Registry, Intune, etc.), information can be found here: https://docs.microsoft.com/en-us/windows/security/threat-protection/windows-defender-exploit-guard/enable-virtualization-based-protection-of-code-integrity
After booting the system up and attempting the patch, we can no longer supply any value and bypass the login. These protections seem to be working as expected. Now that it’s working, we began looking for ways to bypass this. Ulf Frisk did a presentation Chaos Communications Congress 34 where he performed a demo of successfully getting code execution by attacking the UEFI loader. https://www.youtube.com/watch?v=XcEYkcwbRX8&t=1356s
While we did not take this route during our testing, we feel it is still worth noting, as this shows that there are still ways to attack the OS even with the protections in place.
Additional Validation
We wanted to perform additional testing against other configurations, outside of Checkpoint on the Dell laptop. We reached out and another client offered up several laptops for us to test against.
- HP EliteBook running Microsoft Bitlocker no PBA
- Dell Latitude running Microsoft Bitlocker no PBA
As expected, due to these systems not being configured with PBA, we were successful in bypassing the lock screens as depicted above.
Impact Scenarios
These attacks demonstrate that with physical access to a laptop, an attacker can bypass local security protections in place to obtain unrestricted access to the data residing on the hard drive of the system.
- Internal Network Access via Wireless: An attacker can gain internal network access at corporations that have wireless access configured with certificates + Windows credentials. The certificate is stored locally on the machine and it is likely trivial to extract cached domain credentials once administrative access is obtained. By getting close enough to corporate offices, an attacker may be able to easily connect to the WiFi network.
- Internal Network Access via Remote Access / VPN: If MFA is not enabled, this is a logical next step for the attacker in this scenario as they can gain access without the need for the physical device. With MFA enabled, it is possible that MFA is not enforced when a whitelisted corporate device is used and there could also be a soft-token stored on the laptop.
- Sensitive Data Access: Any sensitive data stored locally on the system can be extracted by the attacker.
- SSO and Cloud Application Access: If the domain credentials are able to be extracted from the laptop, authenticating with them to the laptop and connecting to any Internet provider may allow an attacker to gain access to applications that use SSO authentication. This could include O365, HRIS applications and cloud ERP systems.
- Social Engineering Attacks: At this point, the attacker knows a wealth of information about the asset and its owner. They also know a lot about the types of applications installed. The combination of this type of information can allow them to initiate very targeted phishing or social engineering attacks in an attempt to gain remote access.
Prevention
While we only tested this against Checkpoint and Bitlocker, any other FDE solution that only provides protection for the data at rest and not during boot, can be exploited to allow direct access to the system. Realistically, the only mitigation control that we’ve identified to prevent these DMA attacks is “pre-boot authentication”. In this scenario, the user is prompted to enter a pin or password in prior to the disk unlocking and booting the OS.
References
- http://blog.frizk.net
- https://github.com/ufrisk/pcileech
- https://www.synacktiv.com/posts/pentest/practical-dma-attack-on-windows-10.html
- https://docs.microsoft.com/en-us/windows/security/threat-protection/windows-defender-exploit-guard/enable-virtualization-based-protection-of-code-integrity
Additional Credit
I’d like to thank Mario Piva, Andrew Scott, and Alex Thai from my team for their assistance on this project.

Dan Astor
Dan specializes in network penetration testing, adversary simulation, and red team operations. Dan is a member and lead of SRA’s R&I team, which researches and develops tools, techniques, and public content.
Dan has worked for clients in several industries including banking, entertainment & media, insurance, healthcare, pharmaceutical, manufacturing, and utilities.
Dan regularly contributes to open source tooling and blog posts. He has also obtained his Offensive Security Certified Professional (OSCP) certification.